How to Check the
Plumbing in the Walls
The plumbing in the walls can begin after the felt has been installed on the roof deck, so have the plumber lined up to come on time. The plumbing rough-in must be completed, specifically the vent pipes that pass through the roof, before the roofing can be installed. Checking this is one of the most important things you will do.

The rough-in work ought to look good, even though it will be hidden! We believe that a person who cares about the neatness and appearance of his work, even the portions that will be concealed, is a person who cares about the whole job, and should do an excellent job for you. When we see a plumbing rough-in that is sloppy and floppy, we expect that plumber's entire installation to be substandard.
Most cities require licensed plumbers for houses, but where there is no building department, there may be no regulating of the requirements for plumbers. That will be all up to you.
Our best advice on hiring a plumber -
1. Don't use a plumber unless you have seen his rough-in and finished work, if possible.
2. Try to hire a plumber who does work for the best home builders in your area. Notice I didn't say “biggest,” but “best” home builders.
3. Don't let the cheapest price dictate your selection. Bad product is remembered long after cheap price is forgotten.
Before the plumbing work begins:
Gas or propane piping? For natural gas, verify or select the gas meter location before starting. In our area, gas lines and fixture connections are installed by the plumber (must be a certified gas fitter).
The propane tank location must be selected early in the construction. It usually has to be 10 feet or so from the house, even if buried. Piping and the tank are installed by the propane company, plus fire places and cooktops. Although the plumber installs the water heater, the propane company runs the line and makes the final connection.
Confirm the exact model and dimensions of your bathtubs and showers.
The tubs and shower units have to be installed at this time, during the “open stud” phase. They are set in mortar or similar solid beds over the floor, and are nailed securely to the wall studs. The plumbing in the wall can't be completed without the fixtures being installed first, so don't put off these selections!
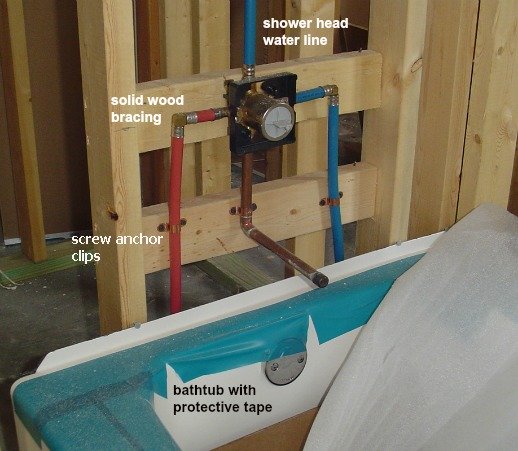
Shower Head Rough In
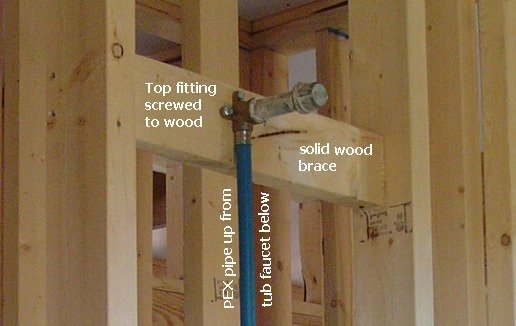
Bath Tub Faucet Rough In
What to look for in water piping:
Your piping should be copper, PEX, or a combination of the two. Both types are full of joints, so the quality of the joints and connections is critical. Compared to copper lines, PEX costs less, is easier to work with, is more flexible, and is less affected by freezing weather.
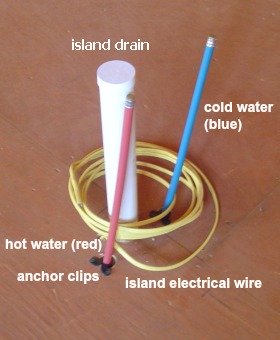
Due to its flexibility, PEX piping can be run with curves and bends not possible with copper, thereby reducing the number of joints. The use of red and blue PEX pipes for color-coded hot and cold water lines is really helpful.
We have used PEX piping on almost all of our houses. It has many advantages over copper or PVC pipes. PEX pipes are less likely to split, resist rupture even with frozen water, and do not rust or corrode like steel or copper. Even with the use of PEX pipes, final connections at fixtures and faucets are made with copper or steel pipes, so threaded attachments can be used.
Kitchen Island Rough In
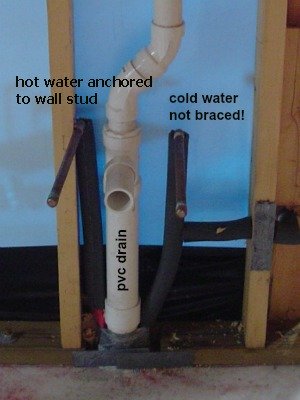
Properly Braced Sink Rough In
Partially Braced Sink Rough In
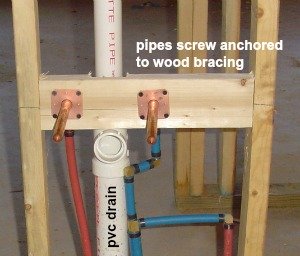
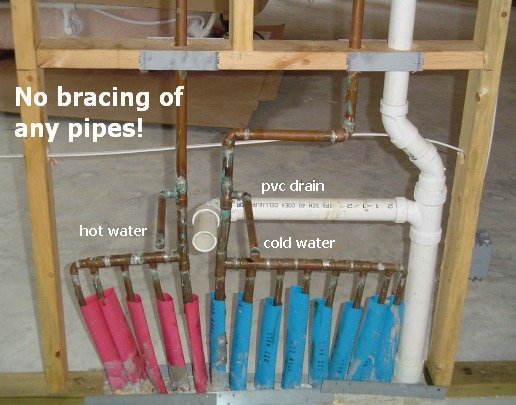
Water pipes must be adequately braced and anchored, not sloppy and floppy. Properly anchoring plumbing in the walls cuts down on the likelihood of pipes flopping around inside the wall. They should be set about in the center of the wall studs, so hitting them with screws or nails will be less likely.
Pipes for plumbing in the walls should always be solidly mounted to the wall framing, especially where they turn and pass through the wall finish. Toilet valve connections, exterior wall hydrants, sink water lines, bath tub faucets, and shower head lines must be securely mounted to stud framing so they won't wobble around when the fixture is attached.
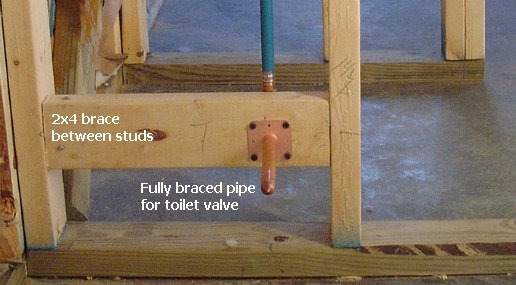
Toilet Valve Piping
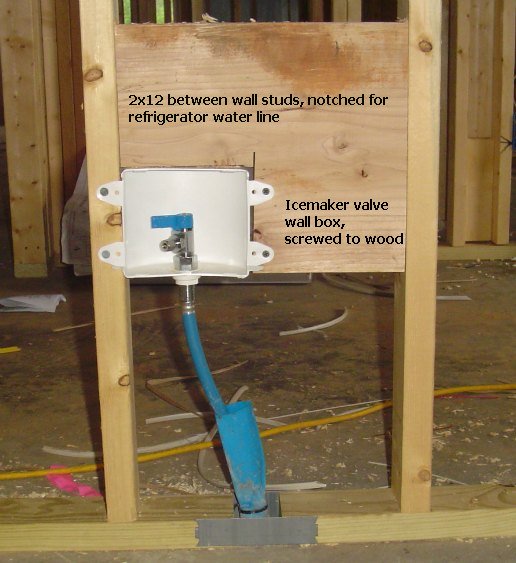
Wall Box for Refrigerator Ice Maker Connection
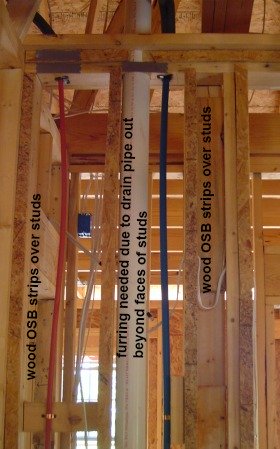
Check for pipes that don't fit completely within the wall. Any pipes that bulge out beyond the face of the wall studs will cause a bulge in the drywall that can't be corrected.
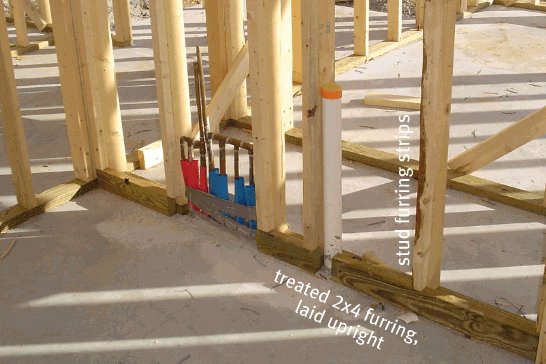
Furr out the studs as needed before the drywall goes in. “Furring” refers to strips of wood applied to the studs to increase the wall depth.
Strips of OSB add 1/2 inch to the depth of the wall, as shown in the photo on the left. Strips of 2x4's and 2x4's turned sideways add 1-1/2 inches of depth, as shown in the photo below.
Sinks and lavatories
Check the bracing of the hot and cold water lines under each sink or lavatory. The pipes must be tightly anchored to the studs, or the faucet piping will be loose and floppy.
If possible, don't have any water piping in exterior walls except for wall hydrants. Sometimes you just can't avoid pipes in exterior walls, with the design of your house. Make sure all the piping in the exterior walls and in uninsulated places is completely covered in pipe insulation. This is installed by the plumber, but I often go behind him and add insulation here and there.
Turn on the water now!? A good plumber will connect the water system to the meter, fill and pressurize the piping, and leave it turned on (unless there is a risk of freezing). This way any leaks from plumbing in the walls are likely to show up before the drywall is installed.
The plumbing inspection will usually be done at the completion of this stage of the project by the local inspectors (building department) as part of the “rough-in inspection.”
We wish you the very best with checking and getting the plumbing in the walls right in the home of your dreams!
Sincerely,
Vic & Susan Hunt
Go to our page on setting bath tubs in the wall framing.
Go from Plumbing in the Walls page to Plumbing in a Slab page.


Vic and Susan Hunt are a husband and wife team with over 10 years experience designing and building homes.


Comments
Have your say about what you just read! Leave us a comment or question in the box below.